First impressions are everything. Whether you’re sending work to your client or handing in an assignment to your professor, you always want to put your best work forward... or allude that you are! However, time is not always on our side. It isn’t uncommon for a client to change the deadline or for that project due date to sneak up on you. While having the ability to use Adobe Photoshop is mandatory in the design field, having the ability to retouch a photo quickly and with impact is less common. You’ll find that, in a bind, having the skills to immediately adjust bad lighting and other retouching tools are crucial.
Here are some tips and tricks for how to retouch photos when time is an issue:Getting Started
- As a baseline, before you are at the point where you need to retouch quickly, it is important to note the importance of raw development and processing. Taking the time to process your raw files correctly will make a great backbone for any image, especially ones that you need to retouch when time is sensitive.
- Turn off your sharpening when exporting raw files that need to be quickly retouched. Since sharpening emphasizes every detail, you may find retouching the image takes longer. With that said, leave the clarity slider at 0 to prevent cheap looking images.
- Depending on the intended use of the image, a smaller file will upload faster quickening your workflow.
Retouching
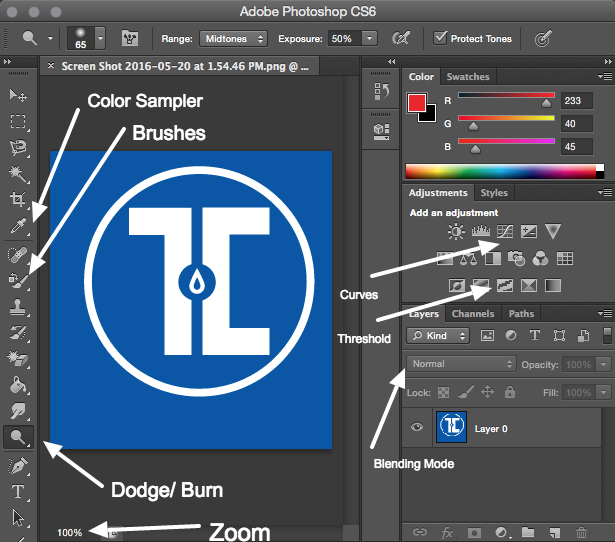
- Editing your work with Dodging and Burning are best done at 100% zoom to speed up the retouching. Only zoom in more if you have areas that require special attention. You’ll find this is a time saver.
- Using the Dodge and Burn tools should be the first technique applied. However, if you need to continue to even out tones, begin frequency separation. This allows you to separate the texture of an image from the tone and the color.
Does The Image Need More?
- Duplicate the background layer. Using a 20% opacity airbrush and color swatches of the areas that need to be fixed, paint around the area to make it look smoother. Then reduce the opacity of the painted layer to [about] 70% in order to output a higher quality image. Be sure to re-sample the color swatches very often to keep the painted colors as natural as possible.
- For body retouching, use a similar method as above. Gently use a 20% opacity paint brush for rough areas. However, this layer should be reduced to [about] a 60% opacity.
- When finished, select the whole image and go to Edit > Copy Merged and then Paste the copied image on a new top layer . Convert the new layer to black and white, change the Blend Mode to Soft Light, and set it to [about] 40% opacity.
It may not end up as clean and precise as it would had you spent hours retouching but it does a quick and sufficient job when you are in a pinch.
White Balance: Really Basic
Go to the image menu, under adjustments, and choose Match Color - click the Neutralize button. Done.
White Balance: Quick Steps
- Create a new layer and [Edit] Fill to 50% Gray.
- Select that layer and change the Blending Mode to Difference.
- Create a Threshold Adjustment layer and drag the slider almost all the way to the left.
- Using the Color Sampler Tool, click the center of one of those blackened areas.
- Once you are done, hide the gray and threshold layers and select your Curves Adjustment layer.
- Instead of using the Black and White Point, choose the Gray Point and use it on the Color Sample Point selected in step 4.
- Remove your Color Sample Point.
More Tips
Don't flatten your PSD/TIFF files before approval. This will save you time if the client requests a small change because you won’t have to edit the file all over again.
Although not recommended for all projects, these tips should help you refine your workflow in a time crunch. If you have other useful tips, please share them in our comment section below!
For more information on digital photography and photo editing classes, check out the arts and technology programs offered by Touro GST!


